
Getting the Perfect Shot in Lightning Photography
Wondering how your friends get great lightning in their images? Are they just REALLY lucky, have impossibly good reflexes, or another trick up their sleeves? Here’s what you’ll need to give yourself the best chance in getting a great lightning shot.
- Camera/Smartphone with the ability to change the shutter speed. (Shutter speed determines how long a camera’s shutter is open, exposing the camera sensor to light.)
- Tripod, or something that will hold your device still between photos
- Pre-plan a great looking spot to shoot
- (Optional) Timer Remote Switch for DSLR camera – this will allow you to take images without having to push the shutter button each time to take a photo!
Word of Caution: Lightning is dangerous and there’s an inherent risk in chasing storms for shots of lightning. There’s much safer types of photography, and ones that are easier to get more consistent results. But if you accept the risks, will seek to be cautious, and are willing to have patience while out there, here’s some tips to capture lightning in an image and get the perfect shot!
My Personal Setup
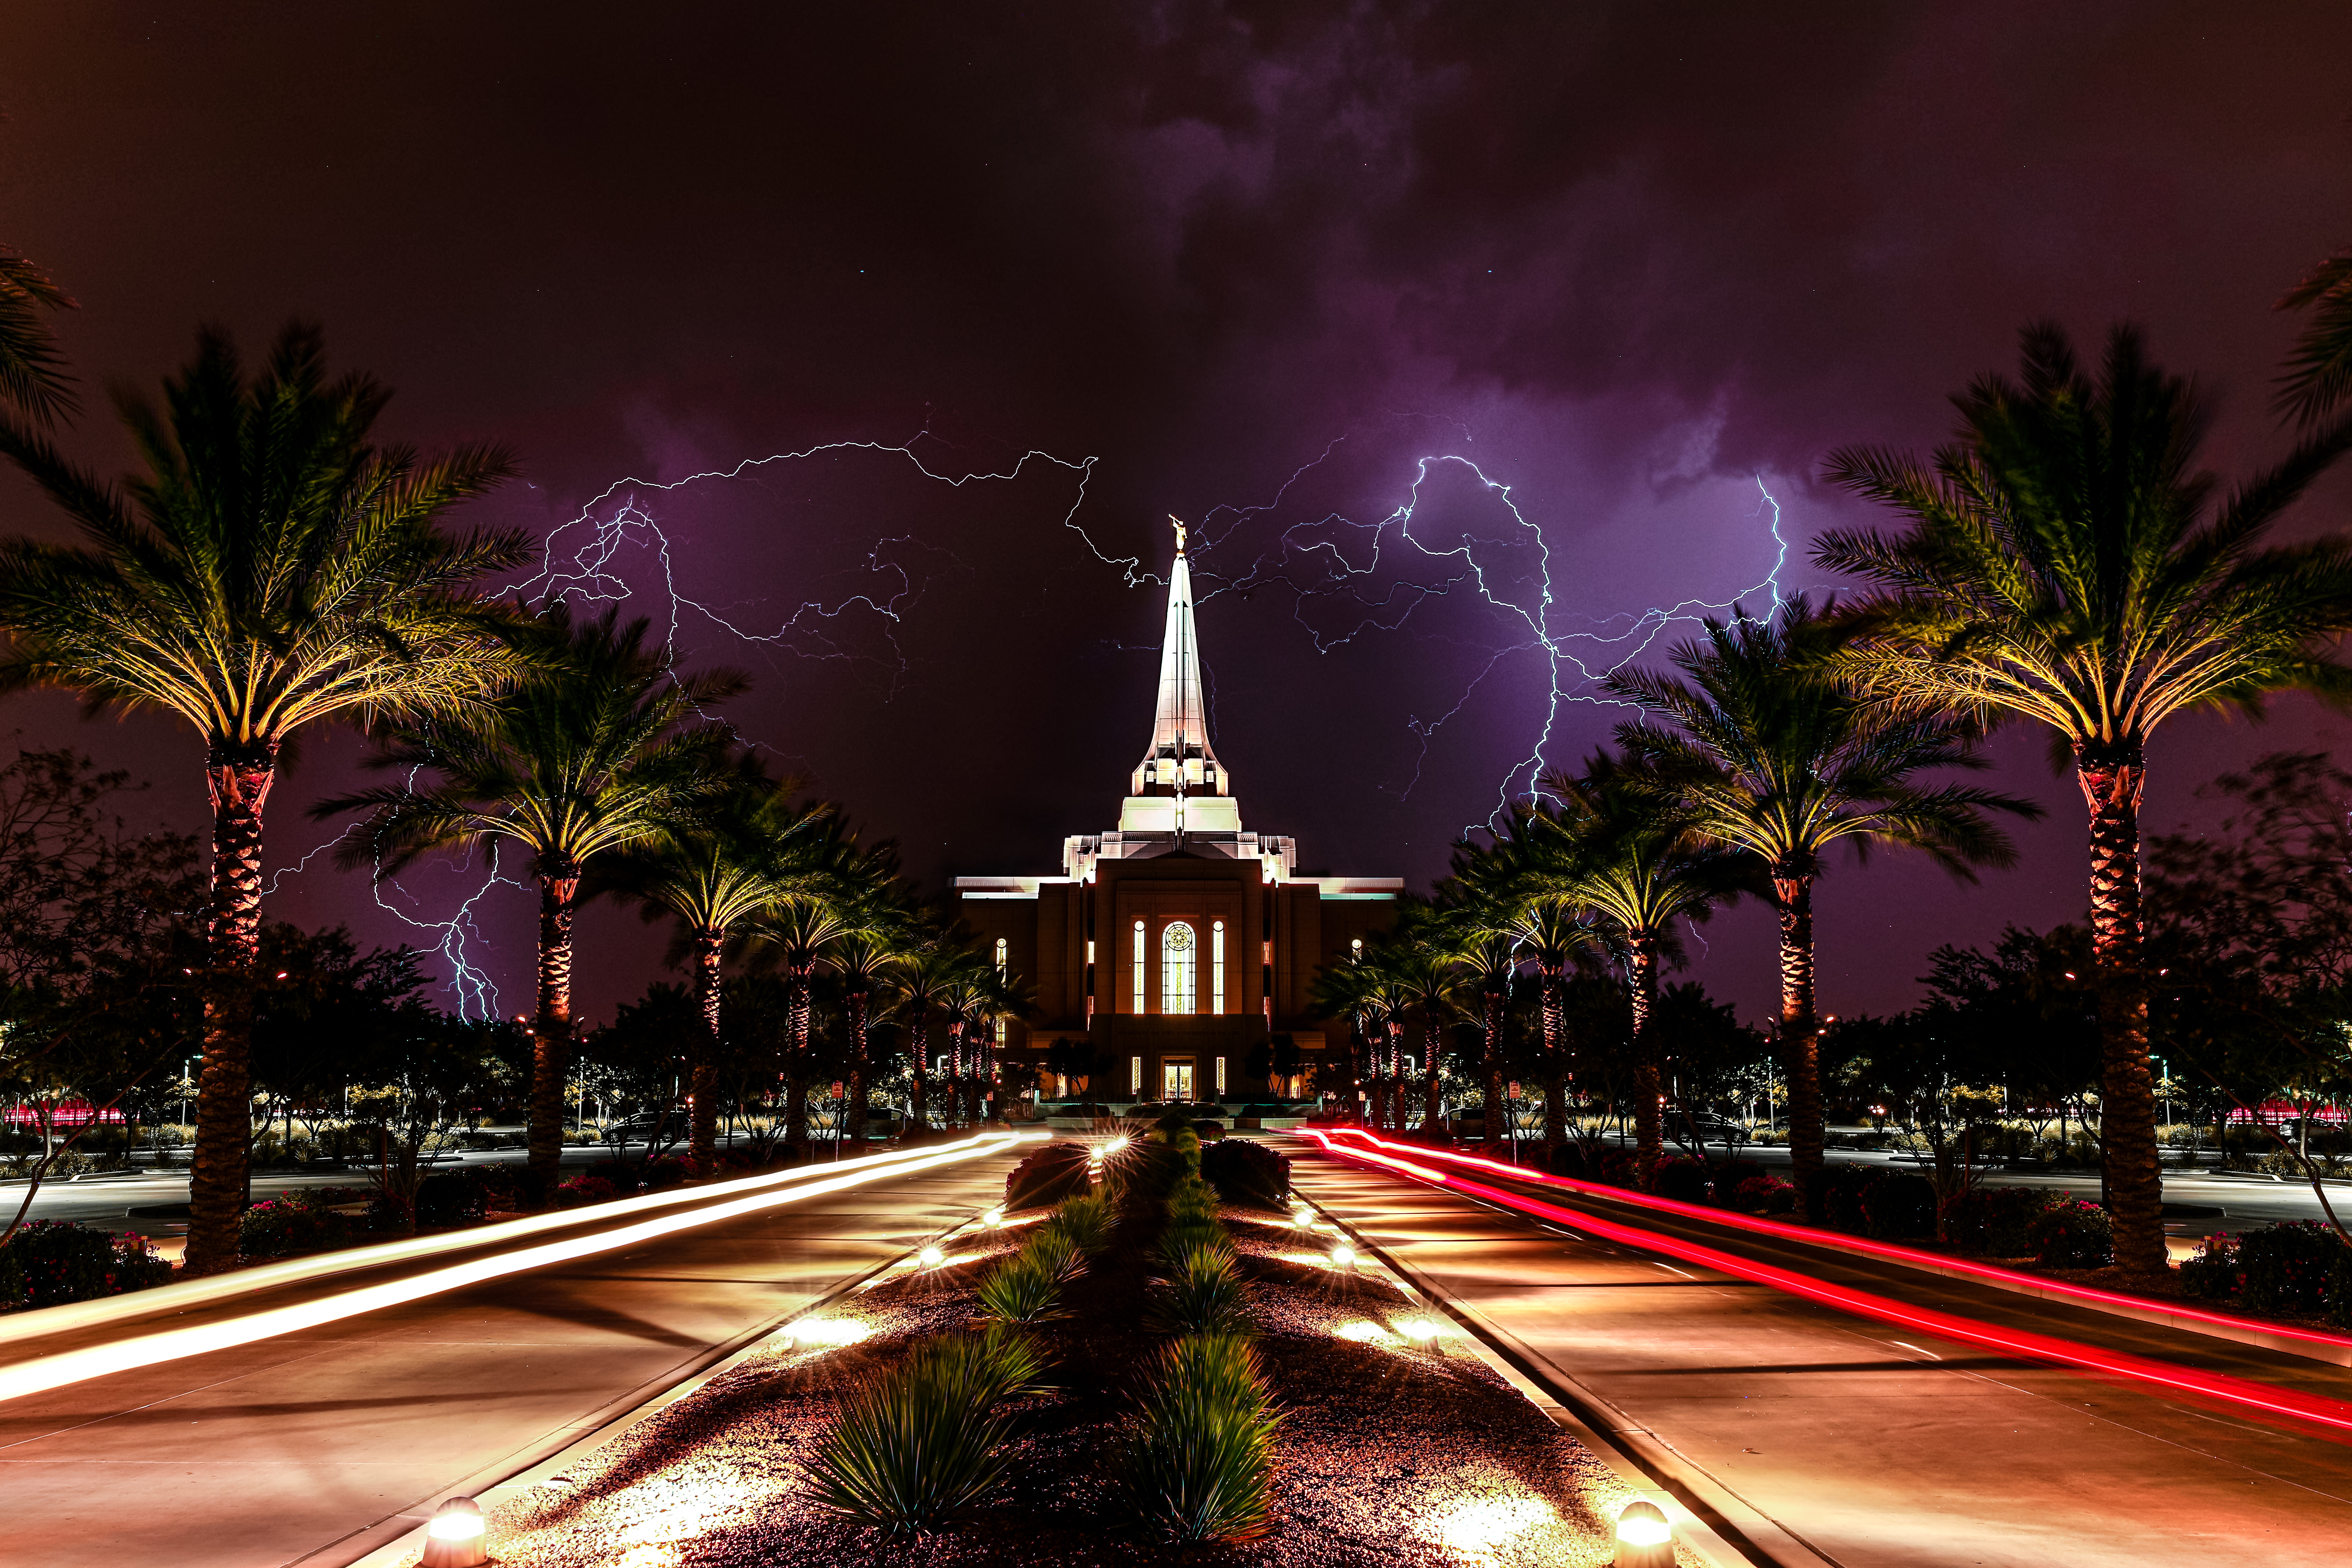
The setup I used to catch the image above was a Canon 5D Mark IV, Canon 16-35mm f2.8 lens, and my Manfrotto Tripod. I also connected my phone to my camera via WiFi to take pictures without pushing the shutter button.
Preparing for Editing in Photoshop by Shooting Without Touching the Camera
(Skip this paragraph if you don’t plan on editing in Photoshop or a similar editing software)
I used my phone to connect to my camera and take pictures because I didn’t want the camera to move at all. I did this because, having images composed the exact same, make it much easier to combine them later in Photoshop. Using Photoshop, one can combine lightning from the best images and show the storm over the course of the night. All these things help to get more consistent results, and work really well with my editing workflow. If you don’t have the ability to edit in Photoshop, it’s not necessary. It just helps make the most of your lightning shoot. Without Photoshop, or a similar editing software, one needs to have patience to wait and make sure they have the shot they’re happy with. What you leave after shooting with is what you’re stuck with!
Setting up and Taking the Shot
So, there’s a storm going on or about to go on nearby, you have the necessary gear and you’re on your way to your pre-picked location to go shoot. Here’s what you need to do to get set up:
- Stand up your tripod and place your camera on top.
- Compose your image by aiming your camera in the direction of the landscape you want to catpure. Make sure to point a little upwards to capture a significant amount of the sky.
- If your camera has the ability to change the aperture, change it to at least f7.3.
- For shutter speed, start with setting it to 30 seconds. This one was shot with a 30 second shutter speed. If you’re shooting in the city, you may need a quicker shutter speed of about 8 seconds. Turn up your ISO as needed. Be cautious of turning your ISO too high and introducing significant noise into your images. The reason for this, is as the shutter is open, the camera sensor will absorb light over time. Having a shorter shutter speed and bumping up the ISO as needed will eliminate absorbing too much ambient light from the street and buildings and will make the flash of the lightning stand out more, since it was capturing a shorter space in time. This also means you’ll have to take more images than you would with a longer shutter speed. Personally, I feel the trade-off for better quality images is worth it!
Editing the Images
From here, if you don’t have any editing software on your computer, you could upload the image onto social media, make a few minor edits with their editing software to bring out the lightning or create the atmosphere you like! Usually, higher contrast filters can work better to make your lightning pop out of the dark sky. For my workflow, I import the images that pass a basic cut into Adobe Lightroom, and make some basic color, lighting and contrast edits, and then I bring my favorites into Adobe Photoshop to work on color grading, sharpening, and combining the images to create the ultimate lightning show in the sky. It’s not necessary to go this far, but typically, the more effort and time spent, the more of a work of an art you can sculpt the images into!
Let me know what questions you have and if you found success in getting the perfect shot in lightning photography. It’s exciting to capture lightning, although at times, it does require patience or a little bit of fleeing to avoid getting soaked! Good luck and happy shooting!

Are you curious about how to shoot similar images to the one just above? Click here to visit my topic on shooting with steel wool and sparks!
Getting the Perfect Shot in Lightning Photography
Wondering how your friends get great lightning in their images? Are they just REALLY lucky, have impossibly good reflexes, or another trick up their sleeves? Here’s what you’ll need to give yourself the best chance in getting a great lightning shot.
- Camera/Smartphone with the ability to change the shutter speed. (Shutter speed determines how long a camera’s shutter is open, exposing the camera sensor to light.)
- Tripod, or something that will hold your device still between photos
- Pre-plan a great looking spot to shoot
- (Optional) Timer Remote Switch for DSLR camera – this will allow you to take images without having to push the shutter button each time to take a photo!
Word of Caution: Lightning is dangerous and there’s an inherent risk in chasing storms for shots of lightning. There’s much safer types of photography, and ones that are easier to get more consistent results. But if you accept the risks, will seek to be cautious, and are willing to have patience while out there, here’s some tips to capture lightning in an image and get the perfect shot!
My Personal Setup
The setup I used to catch the image above was a Canon 5D Mark IV, Canon 16-35mm f2.8 lens, and my Manfrotto Tripod. I also connected my phone to my camera via WiFi to take pictures without pushing the shutter button.
Preparing for Editing in Photoshop by Shooting Without Touching the Camera
(Skip this paragraph if you don’t plan on editing in Photoshop or a similar editing software)
I used my phone to connect to my camera and take pictures because I didn’t want the camera to move at all. I did this because, having images composed the exact same, make it much easier to combine them later in Photoshop. Using Photoshop, one can combine lightning from the best images and show the storm over the course of the night. All these things help to get more consistent results, and work really well with my editing workflow. If you don’t have the ability to edit in Photoshop, it’s not necessary. It just helps make the most of your lightning shoot. Without Photoshop, or a similar editing software, one needs to have patience to wait and make sure they have the shot they’re happy with. What you leave after shooting with is what you’re stuck with!
Setting up and Taking the Shot
So, there’s a storm going on or about to go on nearby, you have the necessary gear and you’re on your way to your pre-picked location to go shoot. Here’s what you need to do to get set up:
- Stand up your tripod and place your camera on top.
- Compose your image by aiming your camera in the direction of the landscape you want to catpure. Make sure to point a little upwards to capture a significant amount of the sky.
- If your camera has the ability to change the aperture, change it to at least f7.3.
- For shutter speed, start with setting it to 30 seconds. This one was shot with a 30 second shutter speed. If you’re shooting in the city, you may need a quicker shutter speed of about 8 seconds. Turn up your ISO as needed. Be cautious of turning your ISO too high and introducing significant noise into your images. The reason for this, is as the shutter is open, the camera sensor will absorb light over time. Having a shorter shutter speed and bumping up the ISO as needed will eliminate absorbing too much ambient light from the street and buildings and will make the flash of the lightning stand out more, since it was capturing a shorter space in time. This also means you’ll have to take more images than you would with a longer shutter speed. Personally, I feel the trade-off for better quality images is worth it!
Editing the Images
From here, if you don’t have any editing software on your computer, you could upload the image onto social media, make a few minor edits with their editing software to bring out the lightning or create the atmosphere you like! Usually, higher contrast filters can work better to make your lightning pop out of the dark sky. For my workflow, I import the images that pass a basic cut into Adobe Lightroom, and make some basic color, lighting and contrast edits, and then I bring my favorites into Adobe Photoshop to work on color grading, sharpening, and combining the images to create the ultimate lightning show in the sky. It’s not necessary to go this far, but typically, the more effort and time spent, the more of a work of an art you can sculpt the images into!
Let me know what questions you have and if you found success in getting the perfect shot in lightning photography. It’s exciting to capture lightning, although at times, it does require patience or a little bit of fleeing to avoid getting soaked! Good luck and happy shooting!
Are you curious about how to shoot similar images to the one just above? Click here to visit my topic on shooting with steel wool and sparks!

Comments